The built in Mailchimp popup feature sucks, like, major bungholios.
It’s hidden amongst the Signup Forms as ‘Subscriber pop-up,’ has limited options, and no statistics. You can make it look ok but your control over who sees it is non-existent and you have no idea how well it’s doing.
It just plain sucks.
I added it to my site and never saw it once, whether I was logged in or in an incognito window. With no stats, I had no idea if anyone had seen it. The functionality is so limited it’s almost useless.
A free WordPress popup plugin came to the rescue
I won’t stand for this crap so I looked up Holler Box, a lightweight and free WordPress popup plugin that I’ve used before. It has a number of features that Mailchimp’s plugin lacks – specific features that turn a popup from a marketing bro nightmare to one respectful of your visitors:
- Choice between a full modal popup and a subtle corner slide in option
- Show popup after scrolling or before leaving the site (ie exit intent)
- Show again after X days (instead of showing a popup repeatedly)
- Analytics to gauge popup performance
Sound good? Let’s get going.
How to install Holler Box
This is easy – login to the WordPress Dashboard and in the left admin menu select Plugins > Add New, and then type Holler Box into the search field.

Then click Install Now, wait a sec while it installs, then click Activate. Easy peasy.
Add your Mailchimp API key to Holler Box’ settings
Before we create a popup, we have to connect Mailchimp & Holler Box. Login to Mailchimp, click on your avatar in the lower left and select Account.

Then go to Extras > API keys.

In the Your API keys section, either copy an existing API key or create a new one.

Go back to WordPress’ Dashboard and go to Holler Box > Settings and paste the API key into the designated field.

Now we can create a pop up.
How to create a WordPress popup with Holler Box (screencast)
Here’s a short screencast on how create a WordPress popup with Holler Box. Below the video are some screenshots, including a ridiculously long with going over all the relevant settings in case you don’t like watching videos (I prefer text & images most of the time).
How to create a WordPress popup with Holler Box (screenshots)
Step 1: add a Holler Box (aka a popup), using one of the following methods.

Next, configure the popup settings.
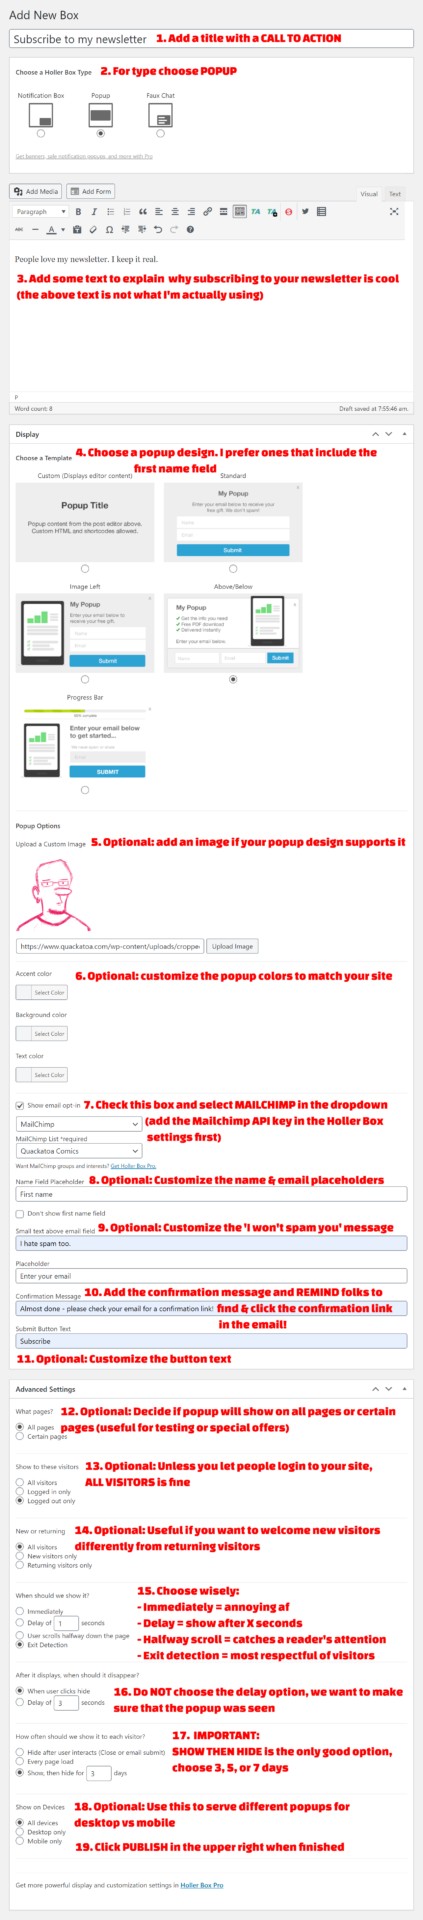
Click Publish when you are done configuring the popup, then go to Holler Box > All Boxes.

This is where you can preview a popup and check popup stats (FYI a conversion rate of 1-2% is normal).
This is what the modal popup I made looked like:

It looks good but more importantly we can make choices that will respect our site visitors and not irritate the crap out of them.
IMPORTANT UPDATE NOT COVERED ABOVE!
After some testing I realized that exit intent does not work on mobile as well as it does on desktop! So I recommend the following:
- Make the current popup Desktop only.
- Make a new popup and copy all the settings from the first popup, except make it Mobile only.
- For the Holler Box Type choose Notification Box.
- Note: notification boxes don’t show the popup title as the headline. If your headline is important, copy it into the text area.
When you’re done you should have 2 popups: a modal popup for desktops, and a notification box for mobile devices.
Go forth and add a Mailchimp popup to your website now
Share this with someone who needs it! And if you’ve got a question, drop a comment below.
Thanks for reading!